Ratfactor's Illustrated Guide to Folding Fitted Sheets

Note to the impatient: You can just scroll down to the drawings of fitted sheets being folded. You won’t hurt my feelings. (I’ll never even know.) But you may want to bookmark this page for later instead. You can get fast at folding fitted sheets. But to learn how to fold fitted sheets is going to take some patience. I do not recommend learning anything, and especially not anything that involves elastic, when you’re in a hurry.
I used to believe that folding a fitted sheet was a task improved by an accelerant (thedoghousediaries.com).
Perhaps you feel this way as well?
Well, one night, I found myself with an unfolded fitted sheet and a half-serious desire to learn how to fold it once and for all.
Thirty minutes later, I had paused and replayed portions of a video from Martha Stewart’s old TV show countless times and…folded the fitted sheet!
Perhaps you, too desire this knowledge? Then join me as I reveal all!
Why we fit the sheets
It is a well-known fact that an ordinary unsecured bed sheet will escape during the night in the form of a ghost. You will likely find it in the corner the next morning. Or, if you leave the window open, you may never find it at all!

To solve this problem, elastic was used to to convert a normal sheet into a creature which loves nothing more than to hug a bed mattress. A fitted sheet will happily remain on a mattress for as long as you allow it.
If you like a bit of history, the bottom of this page has some of that, including real, downloadable patent files to keep and enjoy. Print them out and amaze your friends!
Is it even possible to fold a fitted sheet?
I’m not a topologist. Not even close. But even I can take comfort in knowing that all commercially-available fitted sheets are orientable, two-sided surfaces.
This is in contrast with non-orientable surfaces such as the Möbius strip, which is a single surface with a boundary, or a Klein bottle, which doesn’t even have a boundary.
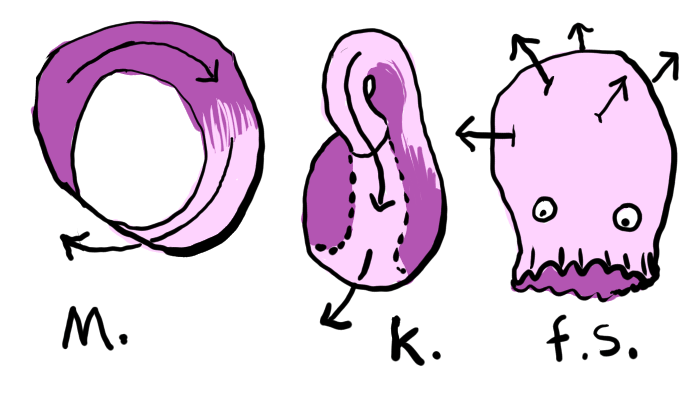
You can fold a Möbius strip all you want, but you’ll never get rid of that twist. If you fold a Klein bottle, you’ll make Clifford Stoll sad.
But a fitted sheet - it can be tamed! It can be folded!
Let’s prove it with a practical demonstration.
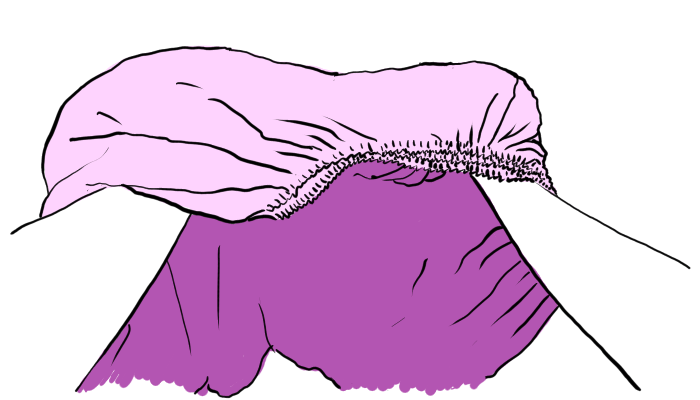
The first, and most obvious observation is that a fitted sheet makes a nice, neat rectangle when it is spread over a mattress.
This leads to the most obvious insight: If you flip the sheet over and pull the corners of the sheet to the corners of the mattress, the "bottom" of the turned-over sheet makes that same reasonably neat rectangle.
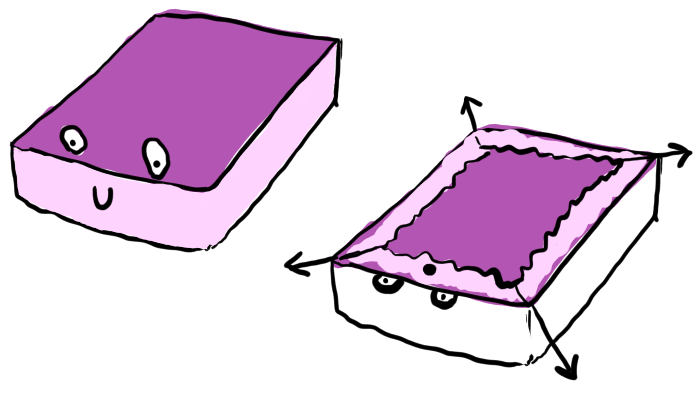
A rectangle of cloth can be folded like paper, even if the inner elastic makes it a particularly hell-spawned paper.
Understanding this leads to a simple, but tedious method of folding a fitted sheet.
A simple, but tedious method
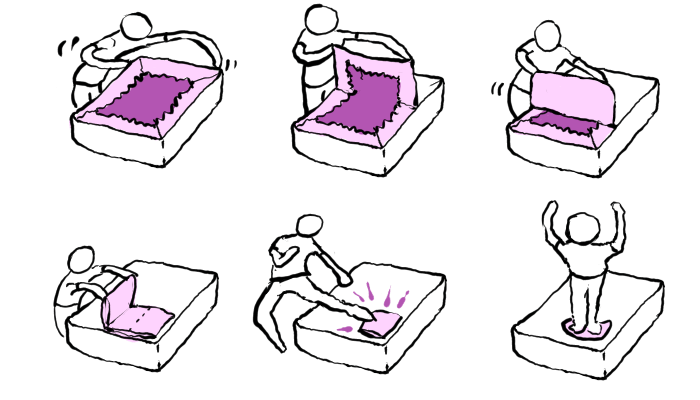
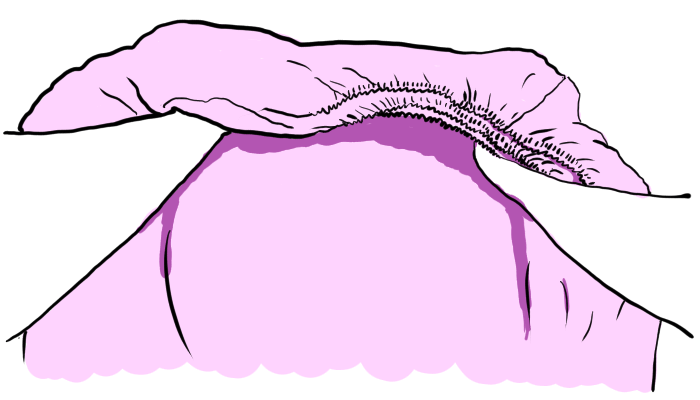
Lay the fitted sheet neatly upside-down (troublesome ruffled elastic center on the top) so that it’s fully flat on a sheet-sized surface such as a bed. Or the floor. Or outside in the road, what do I care, it’s your sheet.
Then:
-
Find the corners of the sheet and tug and tease them until the corners and edges form a pretty decent rectangle. It won’t be perfect because the elastic will always pull it a little round.
-
Fold a third of the sheet down. Smooth it down as if it were paper.
-
Fold the second third. Keep flattening and smoothing.
-
Fold the sheet the short direction in thirds. (In spreadsheet terms, we did rows, now we’re doing columns.)
-
Give a kick in the style of a martial arts expert for the final fold so that the sheet is now a small, subdued bundle.
-
Celebrate by standing on the vanquished sheet with arms raised in victory. This will further compact the bundle for storage. (Clean feet only!)
Folding a fitted sheet by laying it out upside-down on the bed was the first method I completely understood, but it was very slow and required the entire surface of the bed. I had to keep walking around the bed to get at the opposite corners.
In other words, it’s simple, but not easy, in the sense described by software developer Hajime Hoshi (hajimehoshi.com):
Easy: how quickly you can achieve what you want
Simple: how quickly you can understand the model
As savvy sheet folders have known for a long time, arm-based corner-gathering methods aren’t as quick to learn, but they’re much faster…once you understand what you’re doing and get the hang of the movements!
The initial goal
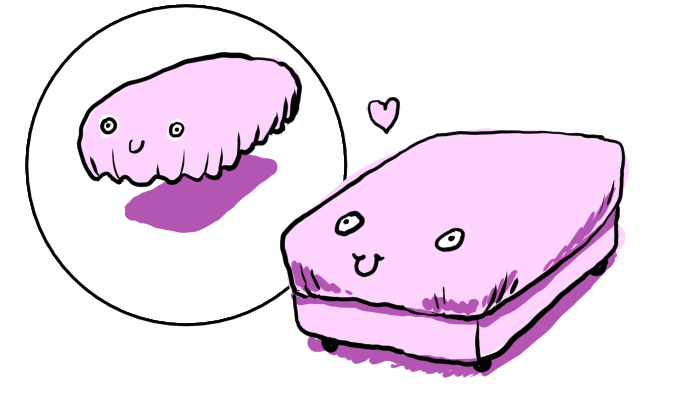
Of course, the ultimate goal is to turn the fitted sheet into a small, roughly rectangular bundle that can sit neatly on a shelf.
But the first goal of folding a fitted sheet is to turn it into some sort of foldable rectangle with the elastic on the inside. This will allow you to envelope the elastic safely away from sight and mind.
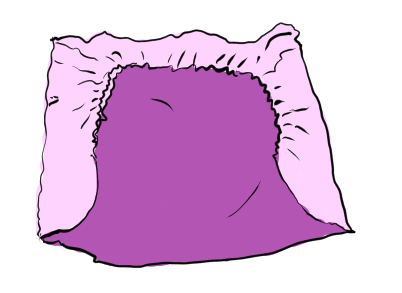
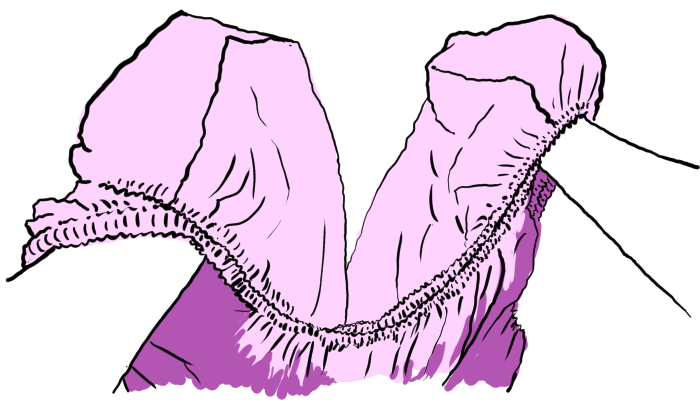
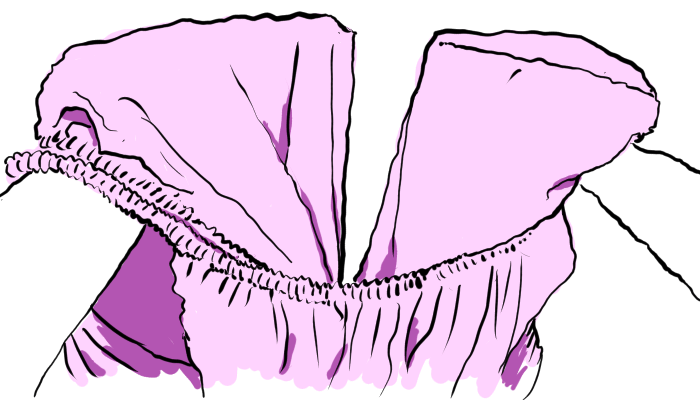
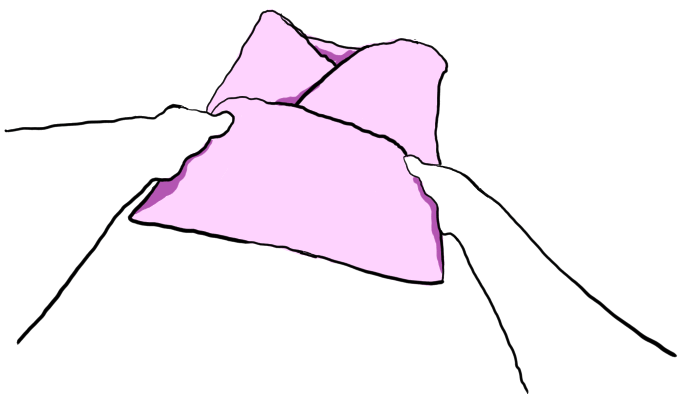
Here’s a half sheet with the corner pockets paired up at the top:
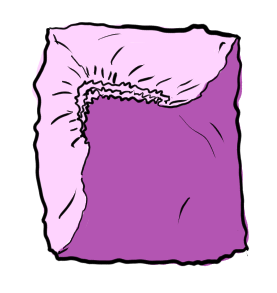
And here’s a quarter sheet with all four pockets together at the top left:
Since both the half and quarter sheets give you roughly rectangular shapes with the elastic inside, both are perfectly valid folding states. You can put either one on a flat surface and fold it like a normal foldable object.
But the quarter sheet with all four corners together has three advantages for the solo home folder:
-
It takes half as much flat folding space - be that bed or folding table.
-
It takes half as much folding and smoothing in the final folding steps.
-
People with normal length arms will be able to fold queen-size and larger sheets with less awkward movements.
Aside: In making this page, I watched as many examples of professional fitted sheet handlers as I could find. In nearly all of the fitted sheet factories, I observed pairs of people working together on half sheets. Each person was responsible for nesting two corner pockets and then the half sheet was folded on a flat surface. At each step, the sheet was briskly made into a neat long rectangle of cloth and fitted with a cardboard insert and folded end-over-end until it was in the final shape.
If you have a helper to fold your sheet and plenty of flat surface, you can crank out a perfectly crisp rectangular shelf-ready bundle in about 30 seconds with the half sheet arrangement.
UPDATE 2026-03-02: We bought a new sheet set and as soon as we got it home, I scurried upstairs and documented its unfolding! Click on the composite image below for the new page where I document the big reveal! (Spoiler: It was folded as observed above.)

(Click to see page devoted to this unfolding event.)
At last, let us begin making our quarter sheet.
Arm-based, corner-gathering, quarter sheet folding
This is where most fitted sheet tutorials start. Hopefully my "First Person Folder" drawings give these instructions a unique twist. If it helps, you can imagine you are in hand-to-hand combat with a cloth demon.
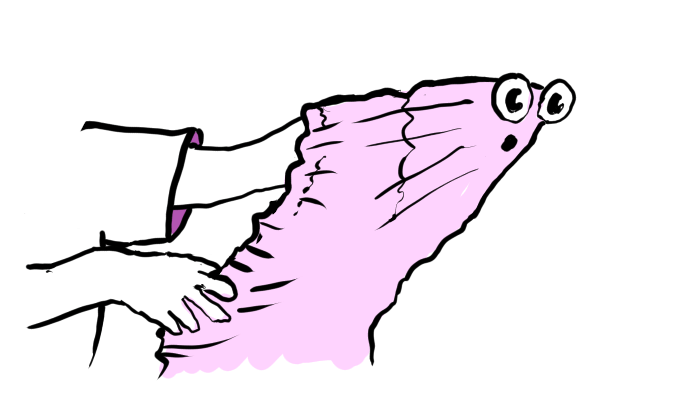
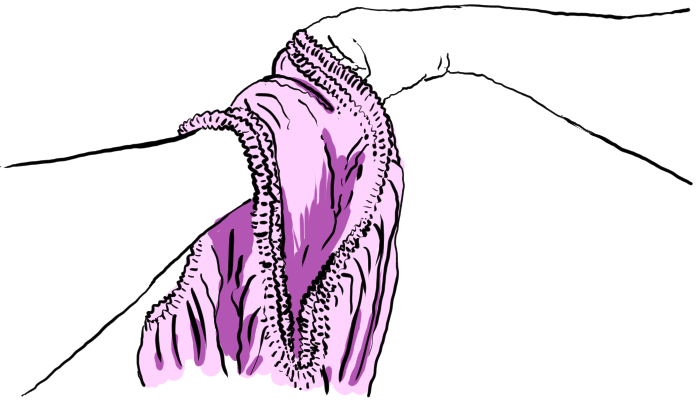
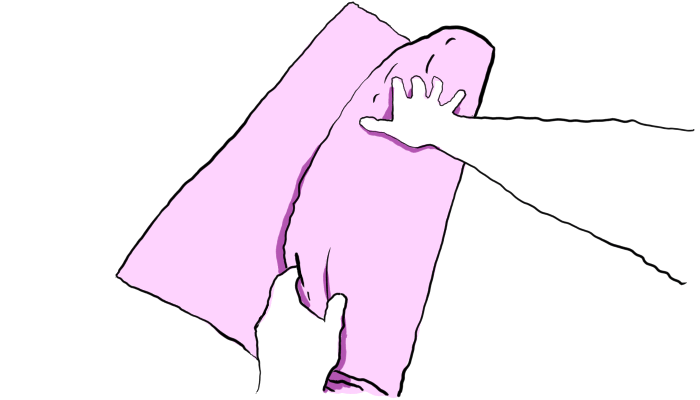
It begins by locating a corner and putting it on an outstretched hand. So let’s do that.
Put your hand in a corner

The face may or may not appear. But know that it’s there. You’ve got your creature in hand now.
Which way should the sheet be facing? Some sheets have a printed pattern on one side, which will look better on the outside of your final folded bundle.
To achieve that, have these first corners inside-out. After you put the first corner with the second one, the sheet will become right-side-out and remain that way for the rest of the folding.
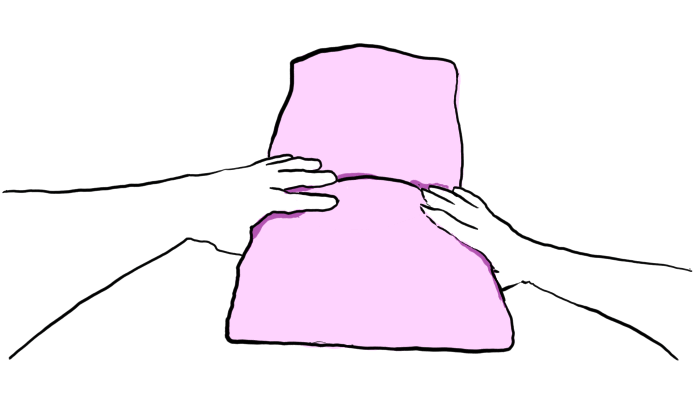
Your free hand goes into the other corner

Now you have two creatures! Hello creatures.
Note that for the step above, you can go to either the corner to your left or right and it doesn’t matter which hand you start with. Do whatever feels most comfortable and natural.
Just make sure you don’t grab a diagonal corner or somehow twist the sheet in getting that second corner. If you’ve got something that looks like my drawing with two hands in two corners, you’re good to go.
Also, do we have any Sesame Street fans in the house? Doesn’t the corner on the right look like one of the "Yip Yip Martians" from Sesame Street? I loved those little aliens.
Make them kiss!
Touch the tips of the corners together.

Aw, how sweet. (Did the heart appear for you too?)
Cover the first corner with the second
Invert one corner over the other, keeping the tips of the corners together.
The result is that one hand ends up in the pocket of both corners. The other hand is free for action once again.
Okay, the next part is where everybody usually gets mixed up and frustrated. (And I believe I know why. Check out the What I do NOT recommend section below to read about that.)
I think I’ve figured out a fool-proof way of explaining this. I certainly ended up making way more drawings than I’d originally planned with the hopes of getting it across. But when it’s all said and done, this is still just a series of two-dimensional drawings and text. It’s not telepathy. So we’ll need to work together to make this happen.
Ready?
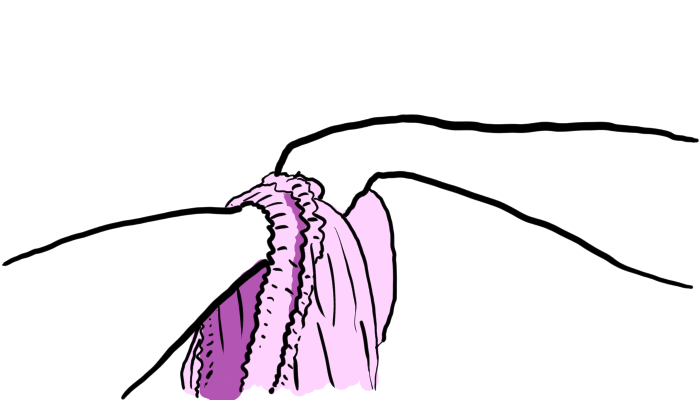
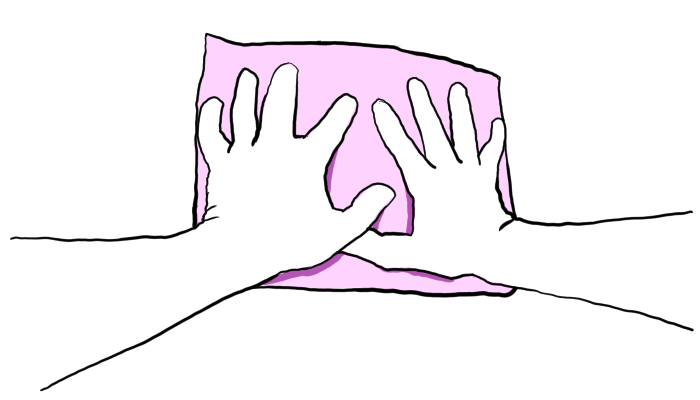
Find the other two corners
With your free hand, grab the two elastic edges and trace them along until you reach the other two corners.
Get the other pair of corners ready
Try to roughly line up the seams of the corners. The elastic makes everything all bunched up and hard to see, so perhaps try stretching it out a bit to get a better lay of the land.
Seriously, take your time with this part. Really focus on what you’re doing with this hand. Get into it.
Tip: Shaking the sheet occasionally between steps can help the cloth fall straight and make it a little more manageable and understandable.
Pop that second pair of corners
Get your hand into that second pair of corner pockets.
The goal here is to have both hands mirroring each other in a pair of pockets, with the rest of the sheet between them, not twisted. It should look roughly like the drawing above.
Line up the corners, prepare for contact!
Line them up like jousting combatants. Corner pointed at corner. Hot sun overhead. Pennants snap in the wind. A hoofbeat on the sod. Here we go…
Touch corner to corner. And then…
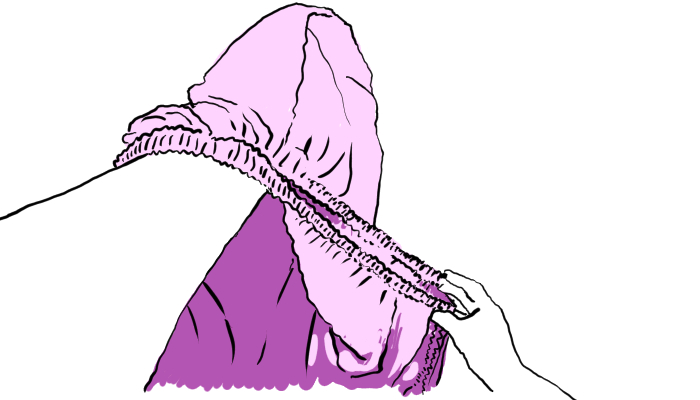
Cover the first corner pair with the second corner pair
Just like when we put the first pair together, now we’re going to invert the second pair over the first.
Admire your consolidated corners
The whole sheet is now on one arm, with your hand in the overlapped corner pockets. All four elastic corners overlap. The rest of the sheet hangs below.
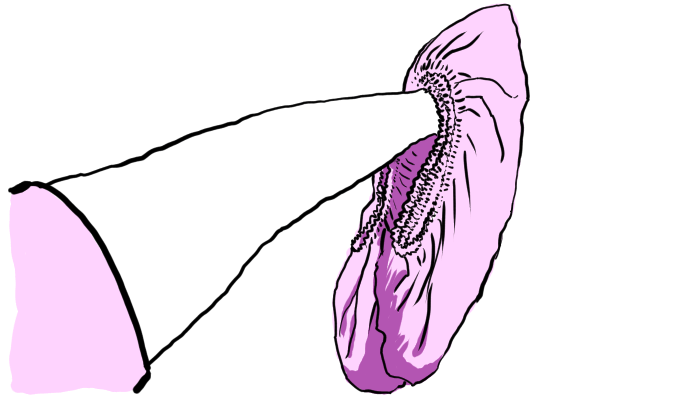
It’s like you are holding a heavy cloak with your hand in the hood. Where did the rest of the wizard go?
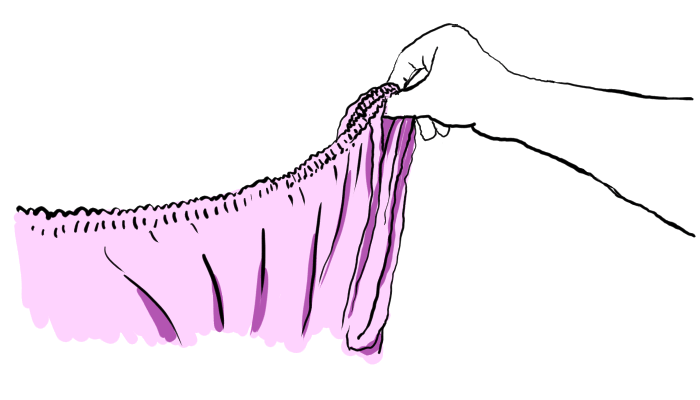
Find the inner edge
What you have now is the quarter sheet - our initial goal! But it doesn’t look like one yet. To get that square shape when you lay it flat, you’ll need to find a coherent edge.
In the drawing below, I’ve switched hands to trace the natural fold inside the sheet.

A quicker method is to get your elbow into the sheet so that your forearm makes a clothesline for the inner fold of the sheet. Describing how to do this is like trying to describe how to toss a pizza crust, so if what I wrote makes sense go for it and if not, don’t worry about it.
Hold your quarter sheet from the inside of an edge
You’re about to put the quarter sheet down. Make sure you have figured out at least one edge of the square that includes your hard-earned corner pocket.
Your hands will be at opposite ends inside the fold. Your arms will be under the four layers of elastic.
Lay the quarter sheet down, straighten and flatten
At last, you can lay the quarter sheet on a flat surface. It’s not too big anymore!
Get it reasonably straight. But only reasonably!
(Yes, you can adjust by pushing the inner corners and tugging gently at the outsides. But keep in mind that the elastic pulls the fabric out of square, so it’s completely unreasonable to try to get four perfect 90 degree angles. Don’t even try!)
Your chance to get genuine straight edges is next.
Start folding!
I’ll be showing the rest of the process, but you’re really on the home stretch here. The "correct" way to fold the quarter sheet actually depends on variables such as the final desired shape and size, the dimensions of the sheet, etc.
It’s pretty safe to experiment here because the quarter sheet is relatively stable.

The important things to know:
-
These folds are your chance go get actual straight edges.
-
You’re entombing the elastic weirdness inside the folds to manage the chaos.
-
You can get it quite neat and crisp by flattening the sheet between each fold.
-
This is the devil’s origami.
Let’s finish this up. I’m doing this in thirds because that worked out pretty well for my sheet and thirds guarantees the rough outer edges end up inside the bundle.
The final bundle will probably resemble a pillow to some degree. The elastic is bulky and there’s no way around that short of squashing it flat in a hydraulic press.
When you put it on a shelf, put the neatest edge facing out and stack some other stuff on it and it’ll look totally professional. Way to go!
All illustrations made by the author with Krita.
What I do NOT recommend
Getting the first two corners together is no problem. But the third and fourth can cause serious confusion.
And having done this quite a few times in the course of making these instructions, I believe I know why: Many fitted sheet folding tutorials recommend finding the third corner and wrapping it over the first two immediately. Then finding the fourth and wrapping that on last.
About half of the time, that worked. But the other half, I ended up with a tangled mess that threatened to summon mighty Cthulhu.
Here’s my actual failed attempt:
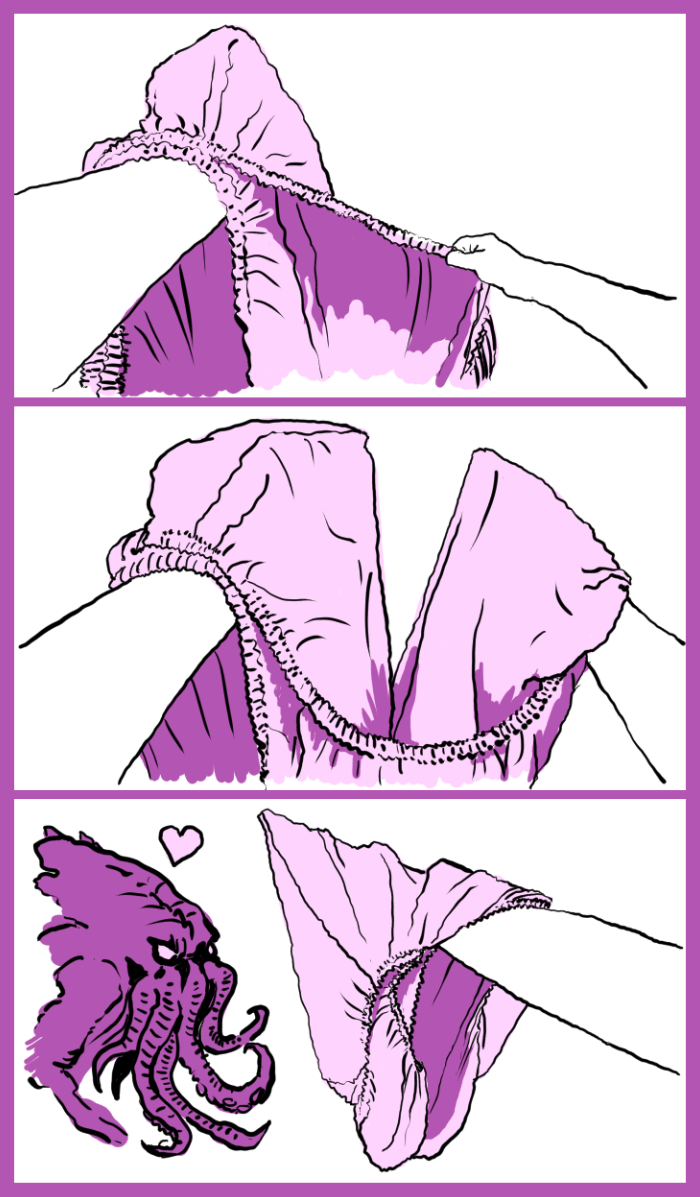
Why would anyone recommend this?
Down in the historical section at the bottom of this page, I mention that in the not-too-distant past, fitted sheets had elastic at the corners, but not around the entire inner perimeter.
I’m pretty sure the one-at-a-time method used to work with the older style sheets with elastic at just the corners.
But with elastic all the way around the entire inner edge like most modern fitted sheets, there is a very high likelyhood of something getting bunched up or tangled in a way that is so hard to undo that you’re really better off just starting over!
My theory is that this old one-corner-at-a-time method is still being taught and that is why people like me thought they couldn’t fold fitted sheets!
A bit of fitted sheet history and the Web is kinda full of nonsense
If you search the Web for the history of fitted sheets, you’re going to find a reference to exactly two patents:
1959 - Bertha Berman of New York: FITTED BED SHEET CONSTRUCTION (PDF, 355Kb)
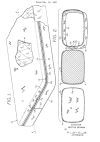
1992 - Gisele Jubinville of Alberta: MATTRESS COVER/FITTED BED SHEET (PDF, 492Kb)

Now, if you actually look at the patents, what you’ll see is that Berman’s was a more complex design that consisted of multiple pieces (but does feature elastic!) And Jubinville’s design, indeed, has the stitched-in elastic design of the mattress-hugging fitted sheet creature we all love to hate today.
But I was alive before 1992 and I can assure you that we had fitted sheets when I was a kid and they weren’t anything like the Berman design.
It doesn’t add up.
A patent search reveals a number of intermediate designs. Some are wacky. But some look very much like a modern fitted sheet. Take this one, for example:
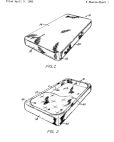
1965 - Belvin Roddey of South Carolina: FITTED BED SHEET AND METHOD FOR MAKING SAME (PDF, 633Kb)
I’m not saying Belvin Roddey’s design is the design used for decades before Jubinville’s design, I’m just saying there were definitely some steps between 1959 and 1992. (To confirm this, you can find fitted sheets from the '80s on Ebay. I saw a set with Disney’s Snow White that looked like she was staring across the decades into an abyss. Sure enough: Elastic at all four corners, just like I remember from my glow-in-the-dark robot space battle set.)
For additional historical tidbits, this article has some fun facts and vintage pictures: Fitted sheets were a fab 50s fad that never faded (clickamericana.com), featuring:
-
A 1954 article about the "popular new fitted sheets"!
-
Fitted sheets (not elastic) were originally invented in the 1940s for baby cribs.
-
A set of instructions for how-to-fold a fitted sheet (pre-elastic!)
The point is that fitted sheets have had an 80 year history that pre-dates the use of elastic.
I don’t quite know how the Legend of the Two Patents was started, but it’s been copied and pasted all over the Web ever since. I blame Big Sheet. Don’t let the fitted sheet "cover up" keep you from the Truth!